Jquery Calendar Code Free Download
I overheard this comment from a developer that I work with just the other day: "If you cannot select it, you cannot work with it". It sounds like one of those classic Far Eastern philosophical sayings that you could apply to everyday life, but I know in this case that she was speaking of the selectors in the very popular jQuery Javascript library.
jQuery's selectors are where you typically first come into contact with the library. Those of you who have worked with CSS extensively will find jQuery's selectors to be very familiar because jQuery makes extensive use of CSS's syntax for selectors. Others who are less familiar with CSS development will undoubtedly learn something new about both jQuery and CSS selectors.
In this article I will show you jQuery's selector syntax, how to optimise jQuery selectors and how to apply more advanced selector combinations to your markup elements. Let's get the journey started with jQuery selector basics.
Learning the basics
The jQuery object (most often seen as $()) is used to wrap an array of elements based on the selectors used. For instance $('div.content p') will wrap all paragraphs that are children of divs having a class of content into a single jQuery object. Once wrapped, the object array can have jQuery (and JavaScript) methods applied to it.
If you're selecting an item by id there will only be one object in the array.
<ul id="list"> <li id="itemOne">First Item</li> <li id="itemTwo">Second Item</li> <li id="itemThree">Third Item</li> <li id="itemFour">Fourth Item</li></ul> $('#itemThree') selects only the third list item and itemThree will be the only element in the jQuery object array for this selector.
In many website designs, ids are not assigned to elements in a web page. If that is the case, how can you select a specific element as demonstrated above? Have a look at this list:
<ul id="list"> <li>First Item</li> <li>Second Item</li> <li>Third Item</li> <li>Fourth Item</li></ul> Using $('li:eq(2)') will get the third list item (note that counting array items in JavaScript, and therefore jQuery, start at 0). While I hate to be confusing about things like this, you should also know that $('li:nth-child(3)') will also get the element. Why does nth-child() start counting at 1? It's due to the fact that CSS is what is called '1-indexed' and the selector nth-child() was born in CSS world, not JavaScript.
If you have more than one list in your web page, you'll need to be more specific with the selector if you're trying to match one item in one list. In the case of the list illustrated you could use $('#list li:eq(2)') or $('#list li:nth-child(3)') to get the third item.
You can wrap multiple elements as an array in the jQuery object by using group identifiers such as HTML tags or class names in a selector. Using $('.content') will gather all of the HTML elements having a class of content into a jQuery object array. Likewise, $('p') will wrap all paragraphs in the document into a single jQuery object.
Taming selectors
One of the things that you really need to be aware of when using jQuery is that selectors are read from right-to-left by the jQuery selector engine, Sizzle (John Resig, sizzlejs.com). What this means is that lengthy selectors are more resource-intensive and may take additional time to perform. Have a look at the following HTML markup:
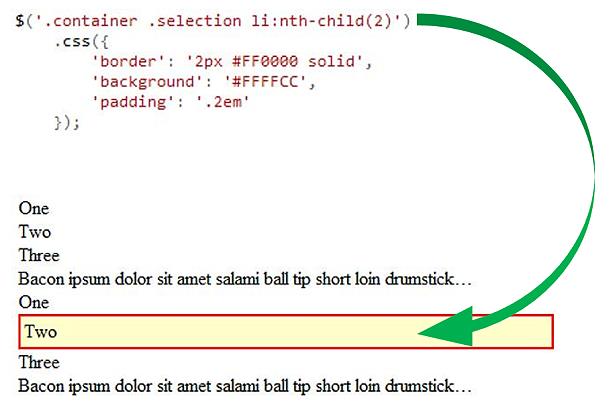
<div class="container" id="section1"> <ul class="list"> <li id="first">One</li> <li id="second">Two</li> <li id="third">Three</li> </ul> <div class="content"> <p class="para">Bacon ipsum dolor sit amet salami ball tip short loin drumstick...</p> </div></div><div class="container" id="section2"> <ul class="selection"> <li id="one">One</li> <li id="two">Two</li> <li id="three">Three</li> </ul> <div class="content"> <p class="para">Bacon ipsum dolor sit amet salami ball tip short loin drumstick...</p> </div></div> This is a rather trumped-up example but if you wanted to select the second list item in the second list, you might use the jQuery selector:
$('.container .selection li:nth-child(2)') The jQuery selector engine essentially says: "First find all list items that are the second children. Then see if they are contained in a class called selection. After that, check to see that selection is a descendant of container. If you have a lot of similarly nested items, this can create a lot of overhead because jQuery has to traverse the DOM (Document Object Model) tree each time the selector is used. It's better to be as specific as possible and in this case you could just use the id of the list item in your selector, $('#three').
Selectors with element identifiers having spaces between them are also known as descendant selectors. The selector used will find all descendants of the class container that have the class of selection, regardless of how far down the DOM tree selection is. If you want to make sure that selection is a direct child of container you would write the selector this way:
$('.container > .selection li:nth-child(2)') The greater-than symbol will force the selection engine to make sure that elements with the class selection are direct descendants of those items having the class container.
Caching selectors
There may come a time where you have to use a lengthy selector or you may need to use a particular selector over and over again. A really good example of this is when you're working with tables full of data that need to be manipulated. An easy way to optimise the action is to cache the jQuery selector object by containing it in a variable:
var cell7 = $('table tr td:nth-child(7)); Then you can use that variable over and over again to manipulate the element:
cell7.css('font-weight', 'bold');cell7.each(function(){ var newValue = $(this).html() + 3.14; $(this).html(newValue);}); Since the variable contains the wrapped object, you won't need to traverse the DOM again to get the data for that selector.
With an understanding of basic jQuery selectors it's time to turn your focus to some of the more advanced selector syntax.
Learning advanced selectors
The great advantage that jQuery offers over many JavaScript libraries is its ability to use the same selectors used in CSS, no matter how complex the selector. CSS style pseudo-selectors are available to you as well as attribute selectors.
Attribute selectors in jQuery offer regular expression-like functionality and can even be combined in ways that provide conditional functionality. I'll use this block of HTML markup to demonstrate:
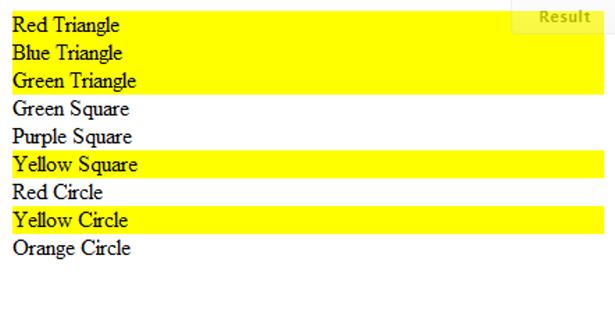
<div class="red triangle">Red Triangle</div><div class="blue triangle">Blue Triangle</div><div class="green triangle">Green Triangle</div><div class="green square">Green Square</div><div class="purple square">Purple Square</div><div class="yellow square">Yellow Square</div><div class="red circle">Red Circle</div><div class="yellow circle">Yellow Circle</div><div class="orange circle">Orange Circle</div> If you want to select the divs where the class "starts with" yellow you would use the ^ (carat) symbol:
$('div[class^="yellow"]') How about selecting all of the items that have classes beginning with yellow OR having the class triangle?
$('div[class^="yellow"],[class ="triangle"]') Here the (tilde) signifies that the attribute selector should look for items where the class "contains the word" triangle. By separating the attribute selectors with a comma you are providing an OR condition to the search. If you remove the comma the AND condition is invoked and will not return any object because there's no element with the class of "yellow triangle". You can continue to chain together attribute selectors together when working with jQuery.
The jQuery attribute selectors will work with any recognised HTML attribute. These selectors give you the power to retrieve elements based on the value of the attribute by having filters applied to them. You can learn more about the attribute selectors by visiting api.jquery.com/category/selectors/attribute-selectors/ .
(If you want to play with the attribute selectors, I've set up a sample that you can manipulate and run at jsfiddle.net).
Using selectors with forms
You can use jQuery's attribute selectors for working with forms and these types of selectors are often perfect for achieving a particular effect such as clearing a form after it is submitted:
$('input[type="text"]').val(''); If you want to clear other input elements you can put additional attribute definitions into the selector:
$('input[type="text"],[type="number]').val(''); Use caution, though! I've seen many a developer use the following selector and wonder why their form, buttons and all, empties out:
$('input').val(''); All of the form's input values will be cleared, including text on any submit or reset elements included in the form. It's a good lesson in being specific with your jQuery selectors.
There'll be times when you will want specialised selectors to work with form elements. You can use the :checked pseudo-selector to select all checkboxes that are checked and the :input pseudo-selector to wrap all of the inputs in a form. Let's use the following form as an example:
<form name="myForm" method="post"> <label for="username">Name</label> <input type="text" name="username" /><br /> <label for="userstreet">Street </label> <input type="text" name="userstreet" /><br /> <label for="usercity">City, State & Zip </label> <input type="text" name="usercity" /> <input type="text" name="userstate" size="2" /> <input type="text" name="userzip" /><br /> <label for="subscribertype">Subscriber Type </label> <select name="subscribertype"> <option value="3">3 Month</option> <option value="6">6 Month</option> <option value="12">12 Month</option> </select><br /> <label for="useremail">E-Mail </label> <input type="text" name="useremail" /><br /> <label for="userphone">Phone </label> <input type="text" name="userphone" /><br /> <label >Preferred Contact </label> E-Mail <input type="checkbox" name="useemail" CHECKED /> Phone <input type="checkbox" name="usephone" /><br /> <input type="submit" value="Submit" /></form> Using $('form[name="myForm"] input:checked') will wrap the input with the checkbox having the CHECKED property. If you want to select all inputs from your form, and it is the only form on the page, you can use $(':input').
Finding out more
Now you've learned the jQuery selector syntax and seen ways to combine and connect the jQuery library's selectors, you're well on your way to start adding jQuery to your web projects.
To really hone your jQuery skills I'd encourage you to spend some time studying the wide array of selectors available for the library. You can do so on the jQuery site at api.jquery.com/category/selectors/.
Source: https://www.creativebloq.com/javascript/getting-most-out-jquery-selectors-7116911
Posted by: raymonlarameee0193173.blogspot.com

Post a Comment for "Jquery Calendar Code Free Download"